
Enjoy your new weighted blanket!!! ☺

I have been wanting to switch things up on my blog lately and post more often about other things, instead of mainly just doing health updates! So I decided to make a post about a do-it-yourself (DIY) project that I just recently, and successfully might I add, project that I did!
DIY project number one = WEIGHTED BLANKET
Like many, I love Pinterest! I love browsing through the millions of photos and have a separate board dedicated to all the DIY projects that I, reassure myself, will do someday! I finally came across this one post that I was genuinely interested in! A weighted blanket. Weighted blankets can be used for many different things such as: acting as a sleep aid, reducing anxiety and stress, preventing meltdowns in people with autism, and reducing restlessness and irritability. I figured, why not give this task a shot! In my case, I made a 20lb blanket! Most of the time, these blankets weigh much less than mine but I was comfortable with this amount of pressure and found it comforting and reassuring.
The supplies that I needed in order to make this blanket:
Total cost of the 4 supplies needed for a 20lb weighted blanket= $18.68
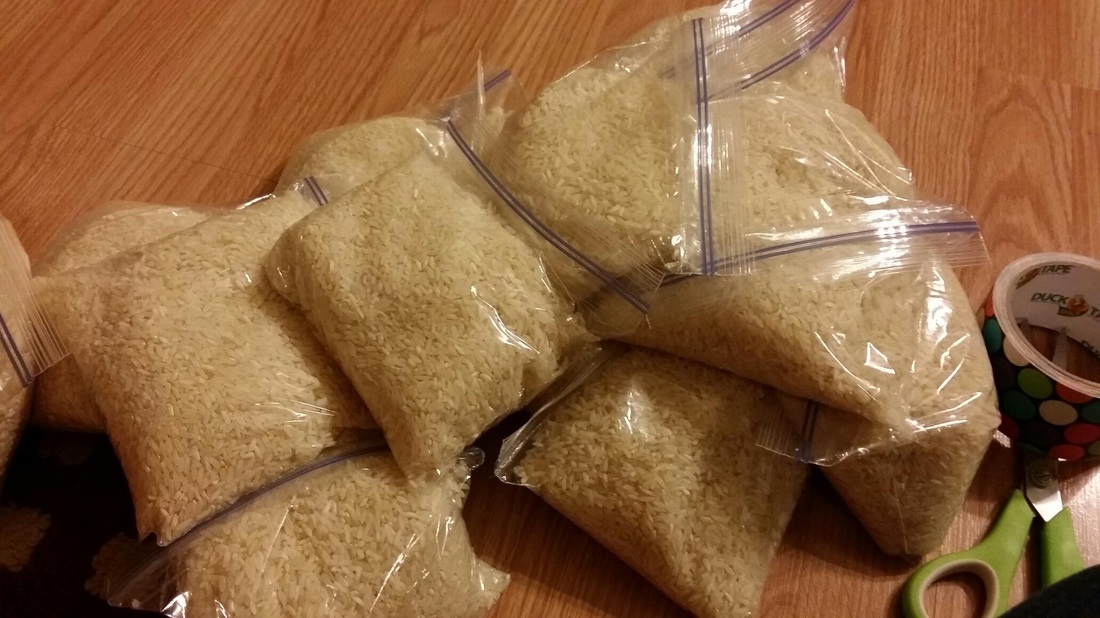
Step #1- Measure out 1lb of rice inside each Ziploc baggie. So in my case, I had 20 bags, each weighing 1lb. (Picture #1)
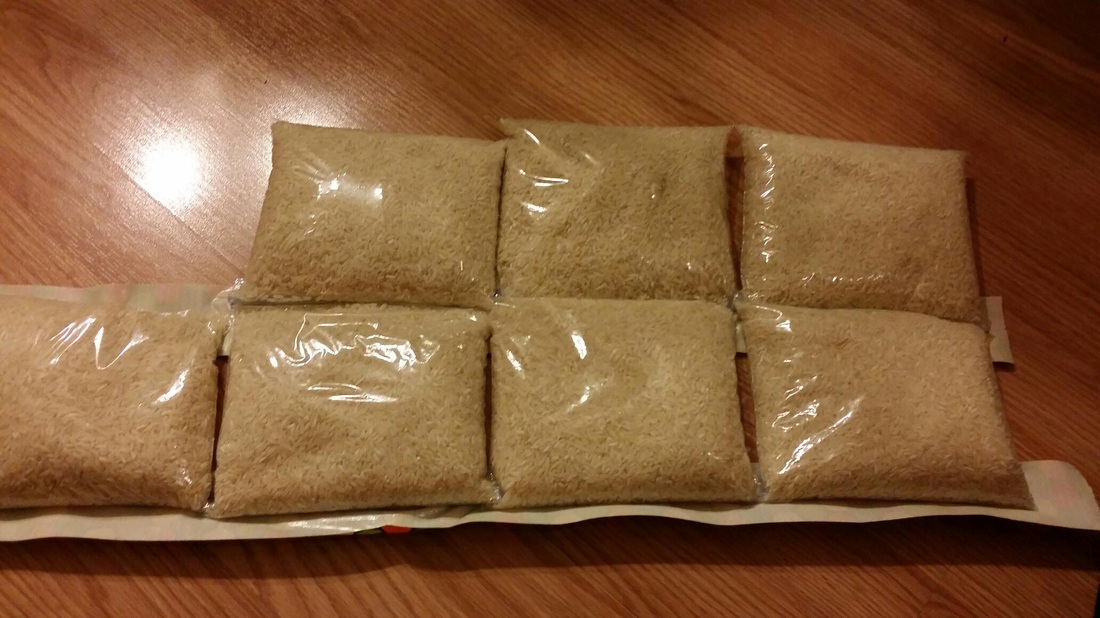
Step #2- Roll out a strip of the duct tape you plan on using. Take the top of the bag and fold it over. Stick the folded part down onto half of the strip of duct tape. (Picture #2) Leave the top half of the duct tape uncovered.
Step #3- Take a second piece of tape (measuring the same length as the first piece) and stick the bottom half of the bags on the top half of the center piece.
Step #4- Take the second row of rice bags and fold over the top part of the bag. Place your second row of rice bags directly underneath the first row of bags. (Also as seen in Picture 2)
*At this point, each row of rice bags should only be taking up half of the width of the strips of duct tape.*
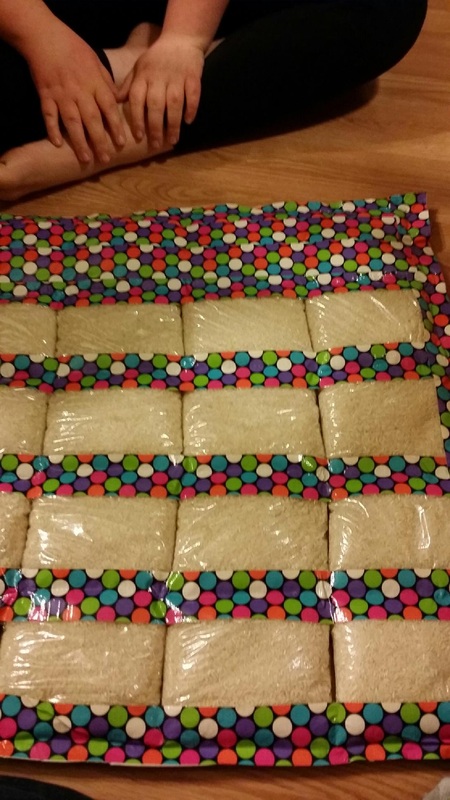
Step #5- Repeat step number four as many times as you wish, making either a lap pad or blanket. In my case I did 5 bags across and 4 bags down. Totaling 20 bags/20lbs.
Step #6- After you're done placing all your rice bags in the formation that you wish them to be in, cut out separate pieces of duct tape and cover the rice bags with it. Overlay each strip of tape each time you add a new layer, preventing any holes or tears of the Ziploc bags. (Picture #3)
Step #7- Continue to add strips of duct tape to your blanket, covering the Ziploc bags, and slightly overlaying the previous piece of duct tape until your the bags are completely covered. Flip your blanket over and follow the same instructions on the opposite side of the blanket.
Step #8- (OPTIONAL) If you picked out a printed pattern of duct tape (like I did) you may choose to keep your blanket the way it looks. You could also purchase a pillow case or some fabric to cover your new weighted blanket, if you don't want the feeling of the duct tape on you. If not, you have (hopefully) successfully completed a DIY weighted blanket! (Picture #4)
DIY project number one = WEIGHTED BLANKET
Like many, I love Pinterest! I love browsing through the millions of photos and have a separate board dedicated to all the DIY projects that I, reassure myself, will do someday! I finally came across this one post that I was genuinely interested in! A weighted blanket. Weighted blankets can be used for many different things such as: acting as a sleep aid, reducing anxiety and stress, preventing meltdowns in people with autism, and reducing restlessness and irritability. I figured, why not give this task a shot! In my case, I made a 20lb blanket! Most of the time, these blankets weigh much less than mine but I was comfortable with this amount of pressure and found it comforting and reassuring.
The supplies that I needed in order to make this blanket:
- 20lb bag of rice = $8.98 at Wal-Mart.
- 2 rolls of printed duct tape. Each roll cost $2.36, making it a total of $4.72 for all the duct tape needed.
- A pair of scissors averaging around $2.00 for a single pair.
- Box of Ziploc, sandwich sized, plastic bags that charge $2.98 for a box of 100 bags.
Total cost of the 4 supplies needed for a 20lb weighted blanket= $18.68
Step #1- Measure out 1lb of rice inside each Ziploc baggie. So in my case, I had 20 bags, each weighing 1lb. (Picture #1)
Step #2- Roll out a strip of the duct tape you plan on using. Take the top of the bag and fold it over. Stick the folded part down onto half of the strip of duct tape. (Picture #2) Leave the top half of the duct tape uncovered.
Step #3- Take a second piece of tape (measuring the same length as the first piece) and stick the bottom half of the bags on the top half of the center piece.
Step #4- Take the second row of rice bags and fold over the top part of the bag. Place your second row of rice bags directly underneath the first row of bags. (Also as seen in Picture 2)
*At this point, each row of rice bags should only be taking up half of the width of the strips of duct tape.*
Step #5- Repeat step number four as many times as you wish, making either a lap pad or blanket. In my case I did 5 bags across and 4 bags down. Totaling 20 bags/20lbs.
Step #6- After you're done placing all your rice bags in the formation that you wish them to be in, cut out separate pieces of duct tape and cover the rice bags with it. Overlay each strip of tape each time you add a new layer, preventing any holes or tears of the Ziploc bags. (Picture #3)
Step #7- Continue to add strips of duct tape to your blanket, covering the Ziploc bags, and slightly overlaying the previous piece of duct tape until your the bags are completely covered. Flip your blanket over and follow the same instructions on the opposite side of the blanket.
Step #8- (OPTIONAL) If you picked out a printed pattern of duct tape (like I did) you may choose to keep your blanket the way it looks. You could also purchase a pillow case or some fabric to cover your new weighted blanket, if you don't want the feeling of the duct tape on you. If not, you have (hopefully) successfully completed a DIY weighted blanket! (Picture #4)

 RSS Feed
